Quiz Set and Quiz
The following links explain how to create and use Quiz Sets and Quizzes.
Create Quiz Set and Quiz
You can create and run fully customizable Quizzes and Questionnaires, and create Articles in ClassClicker. Quiz Sets, Quizzes, and Articles are stored in the cloud.
Steps to create Quiz Set and Quiz
- Click the Quiz Sets icon from Menu.
- Click the Create Quiz button in the Quiz Sets page.
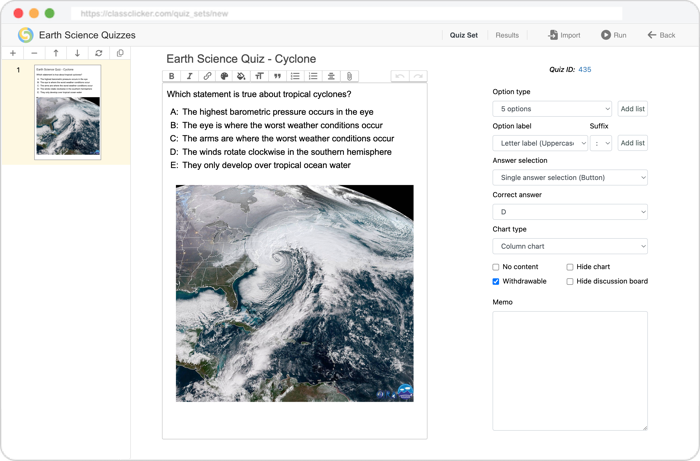
- Enter question or questionnaire information in the Quiz Set page.
- Click the Back button.
- The Quiz Set and Quiz have now been created and the Quiz Set will be shown in the Quiz Sets page.
Header options
- Quiz Set Title
- Enter a Quiz Set title.
- Quiz Set tab
- Click to show the Quiz Set page.
- Results tab
- Click to show the Quiz Set Result Ranking page.
- Import
- Click to import other Quizzes or Articles.
- Run
- Click to run this Quiz Set.
- Back
- Click to go back to the previous page.
Quiz Set options
- button
- Click to add a new Quiz or Article.
- button
- Click to delete the selected Quizzes or Articles.
- button
- Click to move up the selected Quizzes or Articles.
- button
- Click to move down the selected Quizzes or Articles.
- button
- Click to reverse the order of the selected Quizzes or Articles.
- button
- Click to copy the selected Quizzes or Articles.
Quiz options
- Quiz ID
- Click to show the Quiz Result Ranking page.
- Quiz Title
- Enter a Quiz title.
- Quiz / Questionnaire
- Enter Quiz or Questionnaire contents in the text area.
- Option type
- Select the number of multiple choice options from 2 to 20, or select Yes/No, True/False, Agree/Disagree, Positive/Negative, Yes/No/Maybe, True/False/Uncertain, Agree/Disagree/Neutral, Positive/Negative/Neutral, Free Number (Numeric input), Free Word (Word input) or Custom Buttons.
- Option label
- Select a label type for the multiple choice options from Number label, Letter label (Uppercase) and Letter label (Lowercase).
- Suffix
- Select a label suffix type for the multiple choice options from colon, period and single parentheses.
- Add list
- Click to add the list of the multiple choice options to the Quiz or Questionnaire contents.
- Answer selection
- Select the number of answers that the voters can select for the Quiz.
- Correct answer
- Select or enter a Correct answer value for the Quiz.
- Chart type
- Select a chart type.
- No content
- Tick the checkbox not to show the Quiz content.
- Withdrawable
- Tick the checkbox to allow voters to withdraw their answers.
- Hide chart
- Tick the checkbox to hide the chart during the progress of vote.
- Hide board
- Tick the checkbox to hide the discussion board during the progress of vote.
- Show comma
- Tick the checkbox to display submitted numeric answers with commas as thousands separators. The Show comma checkbox is only displayed when the Free Number option type is selected.
- Memo
- Enter a memo here.
Editor toolbar buttons
- Bold button
- Click this button to make the selected text bold.
- Italic button
- Click this button to make the selected text italic.
- Link/Embed button
- Select the text you want to link or unlink, or click the Link/Embed button without selecting any text. In the dialog box that appears, enter a URL and click Link or Unlink to create or remove a link. If the entered URL supports embedding, a Yes, embed it button will appear. Clicking this button allows you to embed the video.
- Text color button
- Click this button to open a color picker dialog box, where you can choose a color to apply to the selected text.
- Text background color button
- Click this button to open a color picker dialog box, where you can choose a background color to apply to the selected text.
- Heading button
- Click this button to apply heading formatting to the selected text.
- Quote button
- Click this button to format the selected text as a block quote.
- Option labels
- Click this button to turn the selected lines of text into labeled options.
- Bullets button
- Click this button to turn the selected lines into a bulleted list.
- Centering button
- Click this button to center the selected lines.
- Zoom text button
- Select the font size (0.8–1.5, default 1.0) to apply to the entire text from the options shown when you click this button.
- Zoom image button
- Select the display size (Full–5%, default Full) to apply to all images from the options shown when you click this button.
- Attach files button
- Select an image file from the file picker that appears when you click this button to insert it into the document.
Run Quiz Set
You can start a voting session (class) with a Quiz Set stored in the cloud.
Steps to start a voting session with a Quiz Set
- Click the Quiz Sets icon from Menu.
- Select My Quiz Sets, a team view, or Public Quiz Sets from View Type.
- Select a Quiz Set with the checkbox in the Quiz Set list.
- Click the Run button.
- The voting session with the Quiz Set begins.
Run Quiz
You can start a voting session (class) with a Quiz or Questionnaire, or with multiple Quizzes or Questionnaires stored in the cloud.
Steps to start a voting session with a Quiz or Questionnaire
- Click the Quiz Sets icon from Menu.
- Click the Quizzes tab to show the Quiz list.
- Select My Quizzes, a team view, or Public Quizzes from View Type.
- Select a Quiz with the checkbox in the Quiz list.
- Click the Run button.
- The voting session with the Quiz begins.
Steps to start a voting session with multiple Quizzes or Questionnaires
- Click the Quiz Sets icon from Menu.
- Click the Quizzes tab to show the Quiz list.
- Select My Quizzes, a team view, or Public Quizzes from View Type.
- Select multiple Quizzes with the checkboxes in the Quiz list.
- Click the Run button.
- The voting session with the Quizzes begins.
Create Quiz Set Link
You can create a link to a Quiz Set and share it with coworkers, other teachers, or other presenters so that they can run the Quiz Set in their own classes. For a Quiz Set in My Quiz Sets or a team view, sharing it by link allows you to share it directly with other users without publishing it in Public Quiz Sets.
Anyone with a ClassClicker account can run the Quiz Set if they have the link. If they are not signed in when they open the link, the Sign in page will be shown first.
Results from users who run the shared Quiz Set can be viewed together with other past results for the same Quiz Set from the Results tab. Quiz Set Result Ranking ranks these results by Average Accuracy and lets you compare information such as the vote date, owner, number of voters, and Average Accuracy across different classes.
You can also use a Quiz Set Link in presentation software such as PowerPoint, Keynote, or Google Slides to quickly launch ClassClicker with the Quiz Set.
Steps to create a Quiz Set Link
- Click the Quiz Sets icon from Menu.
- Select My Quiz Sets, a team view, or Public Quiz Sets from View Type.
- Select a Quiz Set with the checkbox in the Quiz Set list.
- Click the button.
- Click the button to copy the link to your system clipboard.
- Paste the copied link into an email, message, document, or presentation slide to share or use it.
Note: Checking Keep me signed in on the Sign in page can be useful when you frequently launch Quiz Sets from links in presentation software.
Create Quiz Link
You can create a link to a Quiz and share it with coworkers, other teachers, or other presenters so that they can run the Quiz in their own classes. For a Quiz in My Quizzes or a team view, sharing it by link allows you to share it directly with other users without publishing it in Public Quizzes.
Anyone with a ClassClicker account can run the Quiz if they have the link. If they are not signed in when they open the link, the Sign in page will be shown first.
Results from users who run the shared Quiz can be viewed together with other past results for the same Quiz from the Results tab. Quiz Result Ranking ranks these results by Accuracy and lets you compare information such as the vote date, owner, number of voters, and Accuracy across different classes.
You can also use a Quiz Link in presentation software such as PowerPoint, Keynote, or Google Slides to quickly launch ClassClicker with the Quiz.
Steps to create a Quiz Link
- Click the Quiz Sets icon from Menu.
- Click the Quizzes tab to show the Quiz list.
- Select My Quizzes, a team view, or Public Quizzes from View Type.
- Select a Quiz with the checkbox in the Quiz list.
- Click the button.
- Click the button to copy the link to your system clipboard.
- Paste the copied link into an email, message, document, or presentation slide to share or use it.
Note: Checking Keep me signed in on the Sign in page can be useful when you frequently launch Quizzes from links in presentation software.
Publish Quiz Set
You can publish a Quiz Set and share the Quiz Set, its Quizzes, and their voting results with other presenters.
Note: After publishing, the Quiz Set and its Quizzes will become read-only and cannot be edited by anyone, including you. You can still delete them at any time.
Steps to publish a Quiz Set
- Click the Quiz Sets icon from Menu.
- Select My Quiz Sets from View Type.
- Select a Quiz Set.
- Click the button.
- Select Level and Category, then click the Publish button.
- The Quiz Set is published and appears in Public Quiz Sets.
Publish Quiz
You can publish a Quiz and share the Quiz and its voting results with other presenters.
Note: After publishing, the Quiz will become read-only and cannot be edited by anyone, including you. You can still delete it at any time.
Steps to publish a Quiz
- Click the Quiz Sets icon from Menu.
- Click the Quizzes tab to show the Quiz list.
- Select My Quizzes from View Type.
- Select one or more Quizzes.
- Click the button.
- Select Level and Category, then click the Publish button.
- The published Quizzes appear in Public Quizzes.